

If you’re looking for a free VST synth that delivers warm, gritty analog tones, Fury-800 by Full Bucket Music is a fantastic choice. Inspired by classic hardware synths like the Roland SH-101 and TB-303, Fury-800 is a powerful yet easy-to-use virtual analog synthesizer that’s perfect for beginners and seasoned producers alike. In this tutorial, we’ll walk you through the basics of Fury-800, from loading your first patch to creating your own custom sounds. Let’s dive in!
Step 1: Download and Install Fury-800
Before we get started, you’ll need to download and install Fury-800:
- Visit the Full Bucket Music website (fullbucket.de).
- Navigate to the Fury-800 page and download the plugin for your operating system (Windows or macOS).
- Install the plugin following the instructions provided. Fury-800 is available in VST, VST3, and AU formats, so make sure to install it in the correct folder for your DAW.
- Open your DAW and load Fury-800 as a plugin on a new track.
Step 2: Exploring the Interface
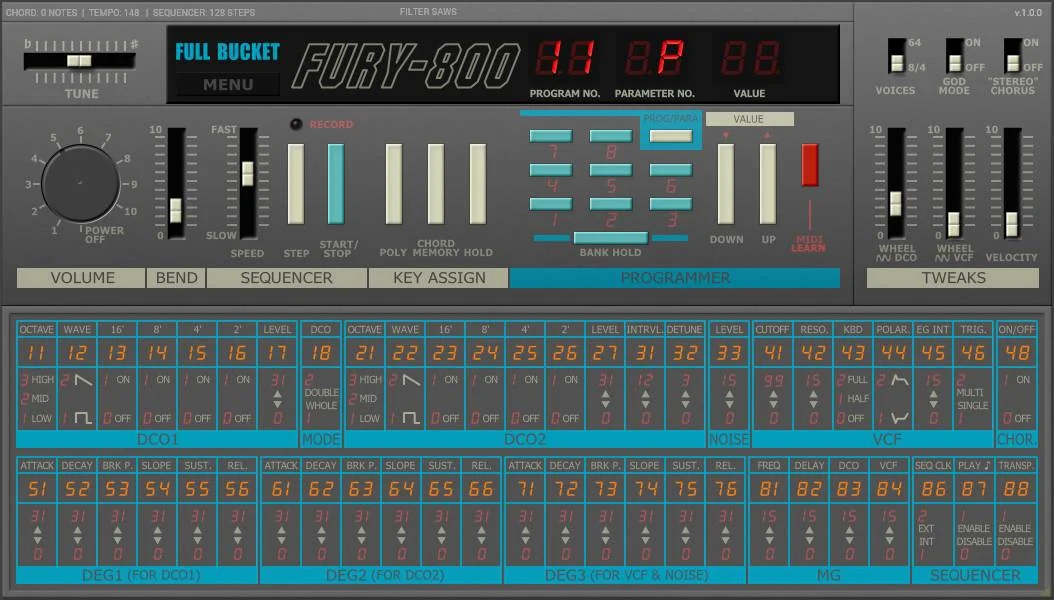
When you first open Fury-800, you’ll see a clean, retro-inspired interface. Here’s a quick breakdown of the main sections:
- Oscillators: Located at the top-left, these generate the raw sound. Fury-800 has two oscillators, each with a range of waveforms.
- Mixer: Below the oscillators, this section controls the volume balance between the oscillators and noise generator.
- Filter: Found in the middle, this shapes the tone of your sound.
- Envelope: Controls the amplitude and filter modulation over time.
- LFO: Adds modulation to parameters like pitch, filter cutoff, and pulse width.
- Output: At the bottom-right, this controls the master volume and includes a handy tuner.
Step 3: Loading a Preset
Let’s start by loading a preset to get a feel for Fury-800’s sound:
- Click on the Preset button at the top of the interface.
- Browse through the list of included presets. Fury-800 comes with a variety of sounds, from basses and leads to pads and effects.
- Select a preset and play some notes on your MIDI keyboard or piano roll. Notice how the preset uses the oscillators, filter, and modulation to create its sound.
Step 4: Creating a Basic Bass Sound
Now let’s create a simple bass patch from scratch:
- Initialize the Patch: Click on the Preset button and select Init to start with a blank slate.
- Set Oscillator 1:
- Set the waveform to Sawtooth.
- Adjust the Tune knob to set the pitch (start at 0 for the default pitch).
- Set Oscillator 2:
- Turn the volume down to 0 for now. We’ll use only Oscillator 1 for this patch.
- Adjust the Filter:
- Set the filter type to Low Pass.
- Lower the Cutoff frequency to around 50% and increase the Resonance slightly to add some bite.
- Shape the Envelope:
- Set the Attack to 0 for an immediate start.
- Adjust the Decay to control how quickly the sound fades after the initial hit.
- Set the Sustain to around 50% and the Release to a short value.
- Add Some LFO Modulation:
- Set the LFO waveform to Triangle.
- Route the LFO to the Filter Cutoff by adjusting the Filter Mod knob.
- Set the LFO rate to a slow speed for a subtle, evolving effect.
Play some low notes on your MIDI keyboard, and you should hear a warm, analog-style bass sound.
Step 5: Adding Oscillator 2 for Layering
Let’s enhance our bass patch by adding Oscillator 2:
- Set Oscillator 2:
- Set the waveform to Square.
- Adjust the Tune knob to detune it slightly from Oscillator 1 (e.g., -7 or +7 cents).
- Adjust the Mixer:
- Increase the volume of Oscillator 2 to blend it with Oscillator 1.
- Experiment with the Noise level to add some grit or texture.
Now your bass sound should have more depth and character.
Step 6: Tweaking the Filter and Envelope
To add more movement to your sound, let’s tweak the filter and envelope:
- Filter Modulation:
- Increase the Envelope Amount in the filter section to make the filter respond more dynamically to your playing.
- Envelope Adjustments:
- Shorten the Decay and increase the Sustain for a punchier sound.
- Experiment with the Release to control how the sound tails off after you release a note.
Step 7: Saving Your Patch
Once you’re happy with your sound, save it as a preset:
- Click on the Preset button.
- Select Save As and give your patch a name.
- Your patch will now be available in the preset browser for future use.
Tips for Further Exploration
- Experiment with Waveforms: Try different combinations of waveforms (e.g., sawtooth + pulse) to create unique sounds.
- Use the LFO Creatively: Route the LFO to parameters like pitch or pulse width for more experimental effects.
- Explore the Presets: Don’t forget to browse the included presets for inspiration and to learn how different parameters can be used.
Conclusion: Unleash Your Creativity with Fury-800
Fury-800 is a fantastic free synth that combines the warmth and grit of classic analog hardware with the convenience of a modern plugin. By following this tutorial, you’ve learned how to create a basic bass patch, but the possibilities are endless. Whether you’re crafting basses, leads, or atmospheric pads, Fury-800 is a versatile tool that rewards experimentation.
So fire up your DAW, load Fury-800, and start exploring its sonic potential. Happy sound designing! 🎛️


