

The Elektron Digitone is a powerhouse of digital synthesis, combining the intricate sound design possibilities of FM synthesis with Elektron’s legendary sequencer and workflow. Whether you’re a seasoned producer or just starting out, the Digitone offers a world of creative potential. But with so many features packed into this compact machine, it can feel a bit overwhelming at first. Don’t worry—this tutorial will guide you through the basics and help you unlock the full potential of your Digitone.
Getting Started: Setting Up Your Digitone
Before diving into sound design and sequencing, let’s make sure your Digitone is ready to go:
- Power Up
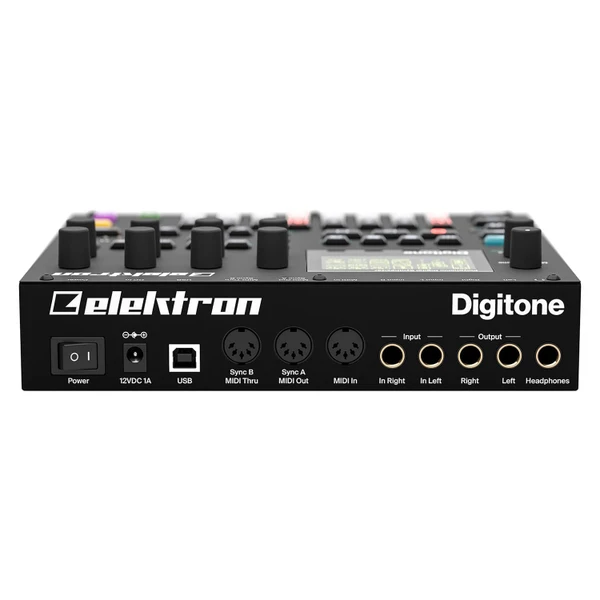
The Digitone can be powered via the included power adapter or with 6 AA batteries, making it perfect for portable use. Connect it to your studio monitors or headphones using the 1/4” audio outputs or headphone jack. - Connect MIDI and Audio
If you’re using the Digitone with other gear, connect MIDI cables to sync with your DAW or external synths. You can also use the USB port for MIDI and audio over USB. - Update the Firmware
Check Elektron’s website for the latest firmware updates. These often include new features, bug fixes, and performance improvements.
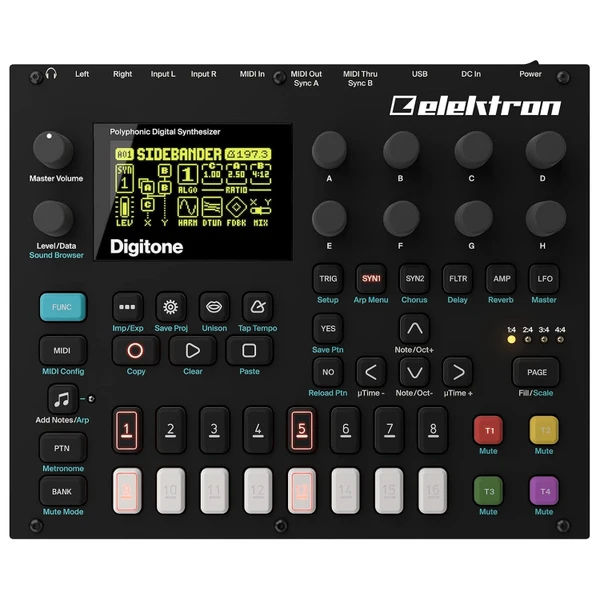
Understanding the Interface
The Digitone’s interface is designed for hands-on control, but it’s helpful to familiarize yourself with its layout:
- Screen: The central display shows parameter values, menus, and sequencer information.
- Encoders: Use these to adjust parameters and navigate menus.
- Track Buttons (1-4): Each button corresponds to one of the Digitone’s four tracks.
- Function Keys (F1-F4): These provide shortcuts to common functions like saving, loading, and accessing menus.
- Step Buttons: Used for sequencing and step editing.
- Play/Stop and Tempo Controls: Start/stop the sequencer and adjust the tempo.
Step 1: Creating Your First Sound
Let’s start by designing a simple patch:
- Select a Track
Press one of the track buttons (1-4) to select a track. Each track can host its own sound. - Initialize the Patch
Hold the FUNC button and press NO to load a default patch. This gives you a clean slate to work with. - Explore the Oscillators
The Digitone uses FM synthesis, which involves modulating one waveform (the carrier) with another (the modulator). Press OSC to access the oscillator menu.- Adjust Ratio to change the pitch relationship between the carrier and modulator.
- Experiment with Feedback to add harmonics and complexity.
- Shape the Sound with Filters and Envelopes
Press FILTER to access the filter section. Use the analog-style filter to shape the tone.
Press AMP to adjust the amplitude envelope (ADSR), which controls how the sound evolves over time. - Add Effects
Press EFFECT to access reverb, delay, and chorus. These can add depth and space to your sound.
Step 2: Programming a Sequence
The Digitone’s sequencer is one of its most powerful features. Here’s how to create a basic sequence:
- Enter Record Mode
Press REC and then PLAY to start recording. Play notes on the keyboard or step buttons to create a pattern. - Use Parameter Locks (P-Locks)
While the sequencer is running, hold a step button and adjust any parameter (e.g., filter cutoff, oscillator ratio). This locks the parameter change to that step, creating dynamic, evolving patterns. - Add Conditional Triggers
Hold FUNC and press a step button to set a condition (e.g., play every other time, or randomly). This adds variation and complexity to your sequence. - Experiment with Micro-Timing
Hold FUNC and turn the TEMPO encoder to adjust the timing of individual steps, creating swing or groove.
Step 3: Layering Tracks
The Digitone has four tracks, which can be used to layer sounds or create polyphonic sequences:
- Assign Sounds to Tracks
Press a track button (1-4) and load a different patch onto each track. For example, use Track 1 for a bass sound, Track 2 for chords, Track 3 for a lead, and Track 4 for percussion. - Sequence Each Track
Create unique patterns for each track. Use the TRACK button to switch between tracks while sequencing. - Balance the Mix
Press MIXER to adjust the volume, panning, and effects send for each track.
Step 4: Saving and Organizing Projects
Once you’ve created a patch or sequence, it’s important to save your work:
- Save a Patch
Hold FUNC and press YES to save the current patch. Give it a name and assign it to a location in the patch bank. - Save a Pattern
Hold FUNC and press YES while in the sequencer view to save the pattern. - Organize Projects
Use the PROJECT menu to create and manage projects. Each project can contain multiple patterns, patches, and settings.
Step 5: Advanced Tips and Tricks
Now that you’ve mastered the basics, here are some advanced techniques to explore:
- Sound Locking
Use sound locks to change the patch for individual steps in a sequence. This allows you to create intricate, evolving patterns. - External MIDI Control
Use the Digitone to sequence external synths or control it with an external MIDI controller for expanded playability. - Overbridge Integration
If you’re using a DAW, connect the Digitone via USB and use Elektron’s Overbridge software for seamless integration and multi-track recording. - Experiment with Modulation
Use the LFOs and modulation matrix to add movement and complexity to your sounds. For example, modulate the filter cutoff with an LFO for a sweeping effect.
Conclusion: Unleash Your Creativity
The Elektron Digitone is a versatile and inspiring instrument that rewards exploration and experimentation. By mastering its synthesis engine, sequencer, and performance features, you can create everything from lush ambient textures to driving techno grooves.
Remember, the key to unlocking the Digitone’s potential is practice and curiosity. Don’t be afraid to dive into the menus, tweak parameters, and push the boundaries of what’s possible. Happy sound designing!


