The Elektron Analog Rytm is a powerhouse of rhythm and sound design, but its depth and complexity can be intimidating for newcomers. Fear not—this tutorial will guide you through the basics, helping you unlock the full potential of this incredible drum machine. By the end, you’ll be crafting beats, shaping sounds, and performing like a pro.
Step 1: Getting Started
- Power Up: Connect the Analog Rytm to power and turn it on. The OLED screen will light up, and you’ll be greeted with the default project.
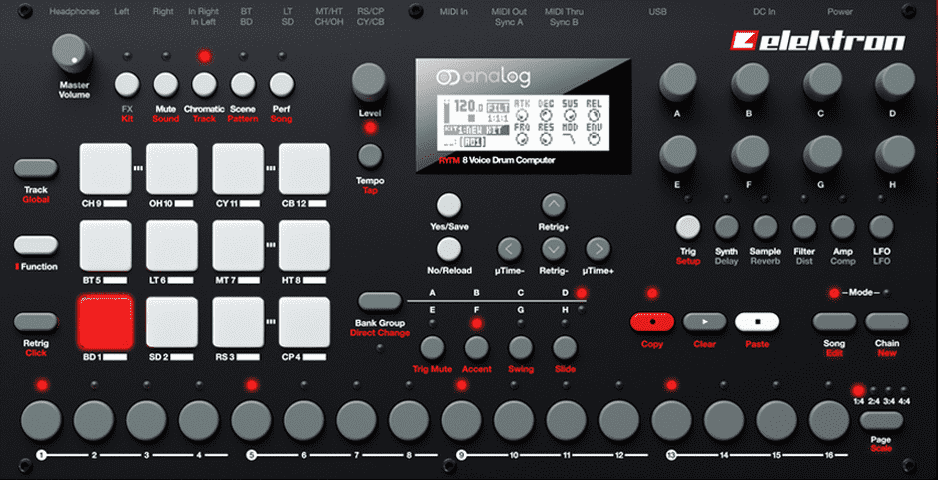
- Navigate the Interface: Familiarize yourself with the layout. The 16 pads are used for triggering sounds and navigating menus, while the knobs control parameters. The screen displays settings and values.
- Select a Kit: Press the PROJECT button, then use the knobs to browse through the available kits. Each kit contains a set of sounds for the eight tracks.
Step 2: Creating Your First Beat
- Enter Sequencer Mode: Press the SEQUENCER button to access the step sequencer.
- Select a Track: Use the TRACK buttons (1-8) to choose a drum sound (e.g., kick, snare, hi-hat).
- Add Steps: Press the pads to activate steps for the selected track. Each pad corresponds to a step in the sequence (1-16 by default).
- Adjust Velocity: Hold a step and turn the LEVEL knob to adjust its velocity (how hard the sound hits).
- Repeat for Other Tracks: Add patterns for other tracks to build a full drum beat.
Step 3: Sound Design Basics
- Select a Sound: Press a TRACK button to choose a sound you want to tweak.
- Edit Parameters: Use the knobs to adjust parameters like pitch, decay, filter, and distortion. For example:
- Turn the PITCH knob to change the tone of a kick drum.
- Adjust the DECAY knob to shorten or lengthen a snare’s tail.
- Layer Samples: Press the SAMPLE button to load a digital sample onto the track. Use the knobs to blend the sample with the analog sound.
Step 4: Using Performance Features
- Performance Macros: Press the MACRO button to access the four macro knobs. These knobs can control multiple parameters at once, allowing for real-time sound manipulation.
- Scenes: Press the SCENE button to morph between two different sound settings. This is perfect for creating dynamic shifts in your track.
- Mute/Unmute Tracks: Press the MUTE button, then tap a TRACK button to mute or unmute it during playback.
Step 5: Advanced Sequencing
- Parameter Locks: Hold a step and tweak a parameter (e.g., pitch, filter) to lock that setting to the step. This allows for intricate, evolving patterns.
- Conditional Triggers: Hold a step and press the FUNC button to set a condition (e.g., play only every other time). This adds complexity and variation to your sequences.
- Change Pattern Length: Press FUNC + YES to adjust the pattern length (up to 64 steps).

Step 6: Saving Your Work
- Save Your Kit: Press PROJECT, then use the knobs to save your current kit. This ensures your sounds and settings are preserved.
- Save Your Pattern: Press PATTERN, then use the knobs to save your sequence. You can create multiple patterns within a project.
Step 7: Connecting to a DAW (Optional)
- Install Overbridge: Download and install Elektron’s Overbridge software on your computer.
- Connect via USB: Plug the Analog Rytm into your computer using a USB cable.
- Multitrack Recording: Open Overbridge in your DAW to record each track separately for further mixing and editing.
Tips for Success
- Experiment: Don’t be afraid to twist knobs and explore unfamiliar parameters. The Rytm rewards experimentation.
- Use the Manual: Elektron’s manual is detailed and well-written. Keep it handy for deeper dives into features.
- Join the Community: Elektron’s user community is active and supportive. Forums and YouTube tutorials are great resources for learning.
Final Thoughts
The Elektron Analog Rytm is a deep and powerful instrument, but with this tutorial, you’re well on your way to mastering it. Whether you’re crafting beats, designing sounds, or performing live, the Rytm offers endless possibilities for creativity. So dive in, explore, and let the rhythm take over!
Happy beat-making! 🎶


